Tomato
From Allotments4All
Sowing
- Seed depth: 13mm
- Germination soil temperature: 27C
- Days to germinate: 6-8
- Sow indoors: 6-7 weeks before last frost
- Sow outdoors: Not recommended for the indeterminates (vine) types due to the short growing season, use determinates (bush)
- Plant outdoors: After all danger of frost has past
Growing
- pH range: 5.8-7.0
- Growing soil temperature: 21C
- Spacing in beds: 38cm supported, 60cm unsupported bush, 90cm unsupported vines
- Watering: Moderate to high during growth, low during harvest
- Light: Full sun
- Nutrient requirements: N=high; P=high, K=high
- Rotation considerations: Avoid following potatoes, peppers or aubergines
- Good companions: Cabbage family, carrot, celery dwarf bean, lettuce, onion, pepper
- Bad companions: Dill, fennel, potato, runner bean
- Seed Longevity: 4 years
Compliments of Rennee's Garden
Starting Tomato Seeds Indoors
Generally, the time to start your seeds is about 6- 8 weeks before the last expected spring frost date in your area, planting the seedlings outdoors about 2 weeks after that date. Another way to figure is to plan on setting out sturdy seedlings in the garden when night temperatures stay in the mid-50 degree range both day and night. Count back and sow seeds 6 to 8 weeks before that date normally arrives.
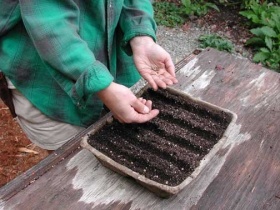
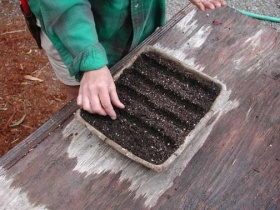
Starting indoors, in a container of well moistened, sterile seed-starting mix, make shallow furrows with a pencil or chopstick about 1/4 in. deep. Sow seeds by dropping them along the bottom of the furrows 1/2 in. apart.
Gently pinch together soil to cover each furrow, covering seeds 1/4 in. deep. Water gently and label each variety. Put container in a warm place, 75-80˚ F. As soon as seed begin germinating and stems start to show above the soil, it's critical to provide a strong light source such as florescent bulbs or a very sunny window.
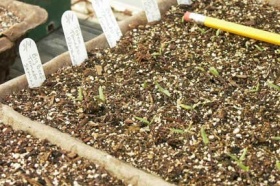
Day 7 - Seedlings have germinated. First to appear are "baby" or "cotyledon" leaves. Careful labeling of each variety is important as they all look alike.
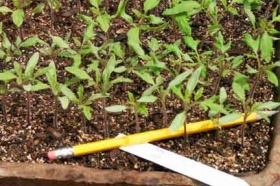
Day 15 - Seedlings are still tiny with just baby cotyledon leaves, but growing well. Note the nice green color of the baby leaves. This indicates that plants are getting enough bright light to thrive.
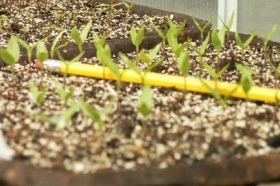
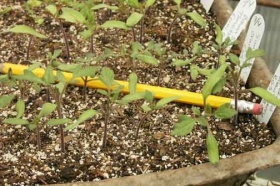
Day 30 - The first set of "true" tomato leaves begin to appear above the baby cotyledon leaves. The best example of this is in front of the pencil eraser in this picture.
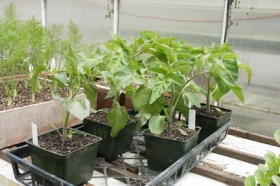
Now that true leaves have emerged on all the seedlings, it's time to transplant seedlings to larger individual containers so they have enough room to properly grow and develop. This process is called "pricking out" the seedlings.
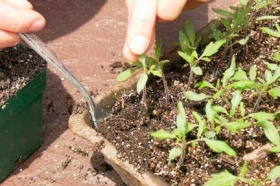
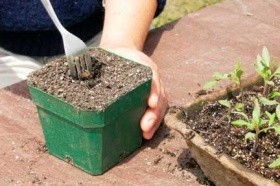
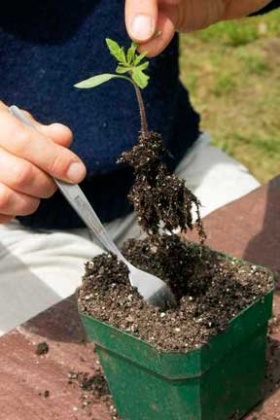
To "prick out": lift seedlings from below, holding each one gently by their baby cotyledon leaves and scooping up entire soil ball from below. We find an old fork works well for this.
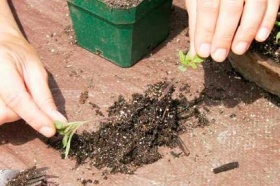
If roots have grown together into a clump, gently tease seedlings apart, holding by baby cotyledon leaves.
Transplant each seedling into its own container (at least 3-4 in. in diameter) filled with good quality, well moistened potting mix. Make a hole to receive each seedling.
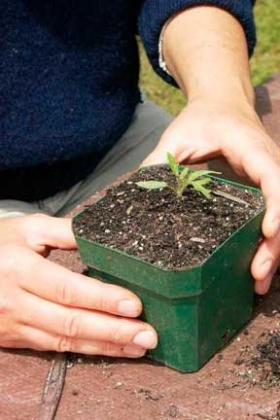
Insert each seedling into the hole to the base of its cotyledon leaves.
Tomato seedlings will readily grow new roots along their buried stems and the resulting plants will be sturdy and vigorous. Gently water in the seedlings to settle the plants.
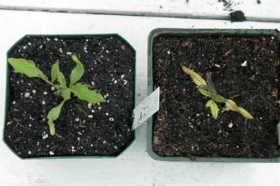
Here are examples of what healthy and cold stressed seedling look like. Remember that seedlings need to be kept at about 65 - 70 degrees after they have true leaves and until they are ready to go into the garden.
When spring weather has warmed up and night temperatures are regularly in the 55 degree range, it's time to plant well rooted, established seedlings outdoors. First plan to acclimate your plants: move them outside into the sun, first for a few hours , then gradually increasing over a weeks' time until they are in full sun all day. this process is called "hardening off" and it avoids transplant shock.
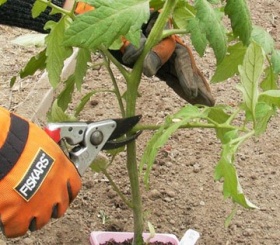
At transplanting time, if hardened off young plants are more than 6 in. tall, remove the bottom branches before planting. New roots will form along the buried stem.
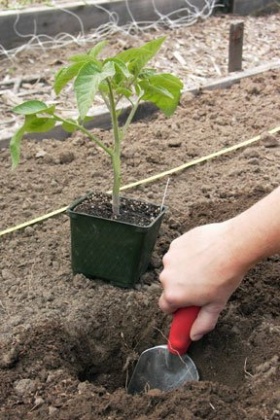
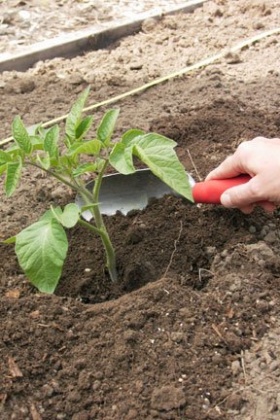
Prepare the hole to receive the seedling.
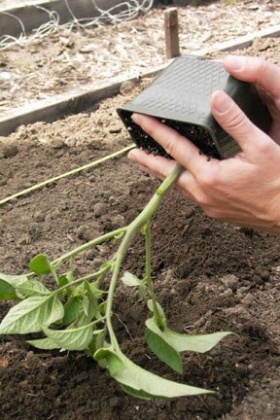
Tip out plant by overturning pot to squeeze or tap out the entire root ball. Note the snipped off lower branches on this example ready to go into the ground.
Settle the seedling into the hole, so the entire stem will be covered up to where leafy branches begin. Pull soil around the plant and firm.
Water gently but thoroughly and erect your tomato supports. Be sure they are well secured, because your plants will grow large and heavy with fruit, so you will need strong support for the branches.
Growing methods
There are three cultural systems for growing garden tomatoes. They include; untrained and sprawling, staked and tied, and caged. Each system has it's advantages and disadvantages. Choose the system that works best in your garden situation.
Tomatoes can be allowed to sprawl on the ground. The advantage to this method is that the tomatoes are more productive. Yields can be as high as 25 pounds of tomatoes per bush. The fruit are not particularly large, but they are numerous.
When tomatoes are allowed to sprawl, a mulch must be placed over the soil underneath plants. This prevents the fruit from laying directly on the soil where it is exposed to insects and soil fungi. Straw mulch is best for tomatoes. It is soft, light and airy; keeping the fruit cushioned and dry. Straw bales can be purchased at local feed stores. A bale goes a long way, so if you have just a few tomato plants most feed stores will sell you a smaller amount of loose straw. Bring your own bag(s) to fill up. Straw is great for mulching other summer vegetables too.
Letting your tomatoes sprawl has it's drawbacks. For instance, they take up lots of garden space; maybe more than you have to spare. Tomatoes grown in a sprawling fashion are more directly exposed to the mid-day sun. This can cause tomatoes to become sunburnt. The fruit most exposed to direct sunlight will develop a large, buff-colored blotch. A rot may then develop in this damaged portion of the fruit.
Tomatoes can also be trained by staking and tying. Place the stake in the ground at the time of planting or shortly after so as not to do damage the roots. The stake should be located within a few inches of the main stem. Use a stake large enough and tall enough to support the weight and height of your plants. Tomatoes can grow up to five feet tall and three feet wide. Large wooden poles of the kind used for staking young trees also work very well for supporting tomatoes.
Tie the main stem of the tomato to the stake using soft cord or stretchable plastic plant ties. To prevent the stem from being held tightly against the stake, loop the tie around the stem. Then tie it on the stake providing some slack in the line.
The great advantage to staking tomatoes is conservation of space. Fruits are larger and easier to pick, however, the number of fruit and total yield is smaller than with sprawling or caging. Staking works best on vining types of tomatoes.
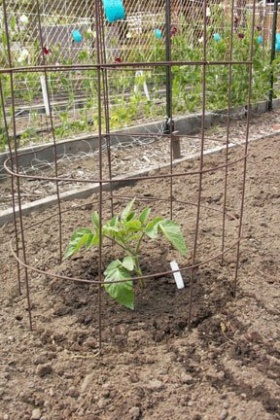
Growing tomatoes in cages may be the best compromise between letting your plants run free or staking them tightly. Most varieties are suitable for caging. Yields are nearly as great as if plants are allowed to sprawl and fruit ripens the best in hot weather.
You can make your own tomato cage by forming a piece of concrete reinforcing wire or wide-mesh fencing into a cylinder about 3 feet wide. Taller cages will require a stakes or a post for support.
Regardless of the type of growing system you incorporate, always mulch under your tomato plants. Mulching keeps the soil cooler and helps hold in moisture. This helps to prevent fruit cracking and blossom-end-rot by keeping soil moisture levels even. Organic mulches such as straw and bagged or home compost work best.
Grow Tomatoes Like Never Before
Free and simple, the Power Tomatoes System will allow you to feed the soil using only minimal amounts of fertilizer!
Best of all, plan for a bumper crop of everybody's favorite midsummer crop!
Whether you're a backyard vegetable gardener or a commercial producer, you can do it yourself—almost effortlessly!
Transplant your seedlings into a home-grown cover crop which you convert into a soil-feeding mulch by mowing!
This simple system, which works well for other vegetables too, was developed by scientists at U.S. Department of Agriculture's Agricultural Research Service in Beltsville, Maryland. To grow tomatoes like never before, carefully follow these directions according to the given timetable:
September
The first step toward a bumper crop beyond your wildest dreams is taken in early September when you prepare permanent raised tomato beds. If you're trying this method for the first time, use an inoculum to establish the proper soil bacteria.
Seed the beds with hairy vetch, a winter-hardy legume that's becoming widely available. Do this about 2 months before winter freezeup. Seedlings will emerge within 1 week. When the first frost arrives, your plants will be 5 to 6 inches tall.
Above ground, these skinny little vines will form a mat, but underground is where the real magic happens. Down below, the root systems, all this time, have been growing into an extensive network. Foliage and root systems will be working together, above and below ground, to hold the soil firmly and stop erosion.
Below-freezing weather will cause the vetch vines to become dormant, but never fear. With the arrival of Spring, the vines will experience reinvigorated growth.
Now that wasn't too tough. And the good news is you’re finished until May. Go clean, sharpen, and oil your gardening tools. Maybe leaf through a gardening catalog or two. Take a nap…
May
By May, individual vines will be 4 or 5 feet long and form thick stands about 2 feet high. Now it's time to kill them.
Yes, I said kill them!
Determine your ideal planting time. The day before, go out and buy however many tomato seedlings you're prepared to cultivate.
Then mow the vetch (a high-speed flail mower is recommended) and leave the residue in place on the beds. For the next several months, the dead vines are going to form a nutritious organic blanket that will snuggle up to your tomato plants (keeping out weeds) and gradually break down into soil nutrients.
Tomorrow you'll transplant young tomato plants right through the mulch residue and into the underlying soil.
Moisture is vital, so you'll need to irrigate. Immediately after planting, install trickle irrigation lines on top of the vetch and 3 to 4 inches from the tomato row. Fix them in place with U-shaped wires.
Fertilizers? A good stand of vetch provides sufficient nitrogen to meet from half to all the nitrogen needed by tomatoes. As for phosphorus, potassium, and essential micronutrients, it's best to have your soil tested—and supplement according to the soil's specific needs.
June…and Beyond
During the first month after mowing, expect the vetch mulch to suppress weed emergence. After that, as the decomposition of the residue advances, weed seedlings are likely to emerge.
One herbicidal application of 0.5 pound active ingredient of metribuzin per acre should do the trick, applied 3 to 4 weeks after transplanting. (Your nursery professional can help compute the quantity needed for small applications.) This application will also kill any regrowth from the mowed vetch plants.
By summer's end, your tomato plants will bear an abundance of fruit, the organic mulch will decompose to a fare-thee-well, and the year will have come full circle.
Mow the old tomato plants and leave them in the field to decompose like the vetch mulch.
Now it's time to reseed with... you guessed it… more hairy vetch!
